Monday 29 September 2014

My Dreamforce 14 Sessions

Screen Shot 2014 09 28 at 08 30 40

Dreamforce is only a couple of weeks away now, and once again I’m (co-)presenting a few session in the dev zone:

Monday 13th October 12:45 - 13:15 - Tech Talks 301: Stage Presence

This is part of a series of talks aimed at encouraging new speakers - from the overview "You'll learn how to overcome your anxiety and present with confidence”.  Very few people are born to present and, believe it or not, I wasn’t one of them. I’m co-presenting this session with Mark Passavoy of Appirio and I’ll share my top tips for great sessions.

https://success.salesforce.com/Ev_Sessions#/session/a2q30000000iWJJAA2

Tuesday 14th October 10:00 - 10:40 - Responsive Design with Visualforce and Twitter Bootstrap

Responsive design is a key requirement when building Visualforce pages nowadays, especially with the advent of Salesforce1 and the need for apps to display appropriately on any device. Come along to this session to learn what responsive design is all about, the key techniques and tools, along with a demo built using Twitter Bootstrap and Visualforce, and a look at the code.

https://success.salesforce.com/Ev_MyAgenda#/session/a2q30000000gunfAAA

Wednesday 15th October 12:15 - 2:45 - Hands-on Workshop: Intermediate Development with Heroku and Force.com

A hands-on Elevate-style workshop in the devzone.  Don’t forget your laptop!

https://success.salesforce.com/Ev_MyAgenda#/session/a2q30000000iHsMAAU

Wednesday 15th October 10:30 - 11:30 - The Salesforce Developer Keynote

Okay, this isn’t one of my sessions - I’m still not important enough to make the stage for this one, although if Dave Carroll twists a knee on the steps up I’m ready to step in! The Developer Keynote is always the highlight of Dreamforce for me and this year will be no different, so make sure you don’t miss out and reserve your seat today.

https://success.salesforce.com/Ev_Sessions#/session/a2q30000000iVwcAAE

I’m also waiting to hear on a couple of other things (*cough* hackathon *cough*), so keep an eye out for updates to this post.

Saturday 27 September 2014

London Salesforce Developers September Meetup

The September gathering of the London Salesforce Developers took place on September 24th at the Make Positive offices on the south side of the River Thames.  The talk this month was a continuation of the previous month’s integration theme on Multi Org Collaborative Architecture, by Richard Clark.

IMG 1468

I’m not going to give too much away about this talk, as it was a dry run for Dreamforce. If you aren’t going to Dreamforce you’ll be able to view the slide deck and probably a recording of the talk as most dev zone sessions are recorded.

What I will say is that there is some good, generic single versus multi-org content which anyone considering the two strategies will find useful, followed by a deeper dive into the challenges and solutions around cross-org collaboration.

As usual this was followed by a trip to a local hostelry for some further discussion and networking (and the usual delays on my train home, as my twitter followers know only too well!).

The inaugural meetup of the London Salesforce Admins takes place on Thursday October 2nd - I’m attending this so stay tuned for a write up after the event.

Saturday 20 September 2014

Sorting Visualforce Tables with JavaScript

Overview

Since the introduction of List Sorting and SOQL offset, presenting tables of sorted data in Visualforce is straightforward.  Both of these require the data to be retrieved/sorted server side, so each time the user changes the sort order of the table a full round trip takes place, including a post containing the view state if the page contains a form. Sorting the table in the client is orders of magnitude faster, and using the JQuery tablesorter plugin, straightforward to implement.

Setup

To demonstrate this, I put together a simple custom controller that pulls 5 accounts from the Salesforce database and makes them available to the page as a list. There’s nothing particularly relevant to the topic of this post, so I won’t be digging into it.  You can view the controller at this gist.

Next, I created a Visualforce page and included the JavaScript resources.  Tablesorter can be downloaded from the home page, but I prefer to use a Content Delivery Network wherever possible. An excellent CDN for JavaScript is cdnjs.com, and this hosts all of the tablesorter resources. I’ve included the JavaScript and a theme to style the table, plus JQuery from the google CDN:

<apex:includeScript
  value="//ajax.googleapis.com/ajax/libs/jquery/1.11.1/jquery.min.js" />>
<apex:includeScript
  value="//cdnjs.cloudflare.com/ajax/libs/jquery.tablesorter/2.17.8/js/jquery.tablesorter.min.js" />
<apex:stylesheet
  value="//cdnjs.cloudflare.com/ajax/libs/jquery.tablesorter/2.17.8/css/theme.blue.css" />

Then a simple datatable to iterate the accounts and output the details:

<apex:datatable value="{!accounts}" var="acc" id="accsTable" styleclass="tablesorter">
  <apex:column headerValue="Created">
    <apex:outputText value="{0, date, dd/MM/yyyy}">
      <apex:param value="{!acc.CreatedDate}" />
    </apex:outputText>
  </apex:column>
  <apex:column headerValue="Name">
    <apex:outputField value="{!acc.Name}" />
  </apex:column>
  <apex:column headerValue="Street">
    <apex:outputField value="{!acc.BillingStreet}" />
  </apex:column>
  <apex:column headerValue="City">
    <apex:outputField value="{!acc.BillingCity}" />
  </apex:column>
  <apex:column headerValue="State">
    <apex:outputField value="{!acc.BillingState}" />
  </apex:column>
  <apex:column headerValue="Postcode">
    <apex:outputField value="{!acc.BillingPostalCode}" />
  </apex:column>
</apex:datatable>

 Note that I’ve specified an id for the datatable and applied the tablesorter CSS class - the former allows the JavaScript to apply the sorting capability to a specific table and the latter allows the chosen theme to be applied.

 Finally, some JavaScript to turn the rendered table into a sortable table:

<script>
  $(document).ready(function()
  {
    $("[id$='accsTable']").tablesorter({theme: 'blue', dateFormat : "dd/mm/yyyy"});
  });
</script>

There are a number of configuration options for tablesorter - I’ve just used two here, to specify the theme I want to use and to change the date format to match that I have used when displaying my account created dates.  This allows tablesorter to identify the column as containing date values, and apply the appropriate sorting algorithm. The final point to note is how I’ve identified the table element - as explained in my $Components versus Selectors post, when Visualforce components are rendered the element id contains the full hierarchy of parent component identifiers, and as my data table can move around, I simply find the element that ends with my specified id, using the id$= selector.

Demo

Like my Slick Salesforce1 Messages with Alertify post, screenshots don’t really do this justice so I’ve recorded a short video showing the page in action:

You can also access a version of this page at my Force.com Demo Site

Gotchas

  • Tablesorter requires that the table contains <THEAD> and <TBODY> HTML elements. The Visualforce datatable renders these elements at present, but if Salesforce were to change this in the future the sorting capability wouldn’t be added. In this situation I’d need to convert this to a vanilla HTML table.
  • This will only sort the rows displayed on the page. If this page displayed a subset of rows in a collection, the sorted values wouldn’t reflect the full dataset. In this scenario I’d re-run the SOQL query with the appropriate ordering or sort the collection of data server side.

Resources

Friday 12 September 2014

Slick Salesforce1 Messages with Alertify

[As I was checking my references and links etc for this post, Fabien updated the home page to indicate that he will no longer be maintaining alertify. I'll continue to use it as it does everything I need and (so far) I haven't encountered any problems with it. Thanks for everything you’ve done Fabien - its a great tool]

In a few of my recent posts around Salesforce1, I’ve made use of the alertify JavaScript library by Fabien Doiron to display animated success/failure/info messages to users. This is such a useful library I’ve decided its worthy of a post and example page all of its own.

While regular Visualforce page messages are a great way to communicate information to the user, when you move to Visualforce remoting in order to provide a more reactive user interface in the Salesforce1 mobile application, a different mechanism needs to be found.  Regular JavaScript alerts can be used, but these are somewhat old-fashioned and provide a less than app-like experience.

Alertify provides styling and animation via a small amount of JavaScript and CSS. The minified library weighs in at a svelte 8Kb, plus an additional 7-8Kb for the CSS, depending on which theme is chosen. I won’t go into full details of alertify, in terms of configuration/options etc, as there is plenty of information and live examples on the home page

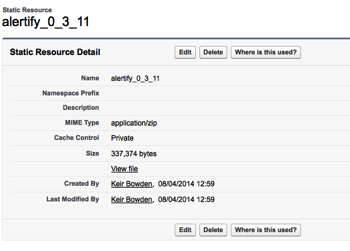
In order to use alertify, download the zip from the home page and upload this as a static resource - I always include the version in the zip file name so that I can serve multiple versions from the same Salesforce instance:

Screen Shot 2014 09 12 at 08 31 06

In order to demonstrate alertify, I’ve put together a simple ‘Check In’ Visualforce page for use as a custom publisher action - this captures the user’s current location and any details they care to add, creates a custom Check In record and posts this to the user’s chatter feed.  As always when I build Salesforce1 publisher actions, I’m using the Bootstrap frameworkalertfy, which I’ve also uploaded as a static resource:


alertify provides a bootstrap theme, so the alerts will match the bootstrap standard colours for warning/info messages etc. To use alertify in my Visuaforce page, I simply include the JavaScript and CSS: 

 
<apex:stylesheet value="{!URLFOR($Resource.alertify,
      'alertify.js-0.3.11/themes/alertify.core.css')}"/>
<apex:stylesheet value="{!URLFOR($Resource.alertify,
      'alertify.js-0.3.11/themes/alertify.bootstrap.css')}"/>
<apex:includeScript value="{!URLFOR($Resource.alertify_0_3_11,
      'alertify.js-0.3.11/lib/alertify.min.js')}"/>

 I then make one small change to the styling to display the alerts half way down the page:

<style>
  .alertify-logs {
      top: 150px;
      right: 10px;
  }
</style>

Once the user has filled in the form and clicked the ‘Submit’ button, the Visualforce remote action is executed and the if successful, a success message is displayed to the user:

alertify.success('Check In Completed');

if, on the other hand, an the checkin fails, an error message is displayed

alertify.error('Checkin failed : ' + result);

similarly, if there is a remoting error:

alertify.error('Remoting error : ' + event.message);

Screenshots don’t really do alertify justice, so I’ve recorded a short video showing the check in in action:

I’ve added this demo functionality to the SF1Utils Github repository - click on on the following links to view the controller and page 

Sunday 7 September 2014

Salesforce1 Notifications from Apex

As documented in the Salesforce Summer 14 Release Notes, there are a number of activities that send a Salesforce1 notification to a user (assuming they haven’t disabled any), but all of these require manual actions to be taken via chatter.  While playing around with some code to notify the owner of a Salesforce system that a new user had been created in their system, I wanted to be able to send a notification programmatically.

The least intrusive mechanism looked to be a post to my profile, with a mention to the user in question - “Keir Chatter” in my case.  My first attempt at this was to simply create a FeedPost instance and set the body of the post to ‘@[Keir Chatter] a new user has been created’. Unfortunately, this simply placed the raw text ‘@[Keir Chatter]’ into the feed and didn’t get picked up as a mention at all.  

After a little research, I realised that I needed to use the Chatter Connect API, specifically the version of the postFeedItem method that takes a ConnectApi.FeedItemInput as a parameter, as the documentation makes clear (the bold is mine): 


postFeedItem(String, ConnectApi.FeedType, String, ConnectApi.FeedItemInput, ConnectApi.BinaryInput)

Adds a feed item to the specified feed from the context user Use this method to post rich text, including @mentions and hashtags, and to attach a file to a feed item. You can also use this method to share a feed item and add a comment. 


Generating a FeedItemInput is a little more complex than simply adding a body property to a post - the mention and the message have to be constructed separately as segments and then attached.  As I wanted this to be reusable, I created a utility method that would take a user id and message and take care of all the heavy lifting (the utility method also excludes attempts to notify yourself - i.e. to post an @mention to yourself on your own chatter feed):

ConnectApi.MessageBodyInput messageInput = 
new ConnectApi.MessageBodyInput();
messageInput.messageSegments = 
new List<ConnectApi.MessageSegmentInput>(); // create and add the mention segment ConnectApi.MentionSegmentInput mentionSegment =
new ConnectApi.MentionSegmentInput(); mentionSegment.id = userId; messageInput.messageSegments.add(mentionSegment); // create and add the message body segment ConnectApi.TextSegmentInput textSegment; textSegment = new ConnectApi.TextSegmentInput(); textSegment.text = message; messageInput.messageSegments.add(textSegment); // create the FeedItemInput and add the messageInput to it ConnectApi.FeedItemInput input =
new ConnectApi.FeedItemInput();
input.body = messageInput;

// finally, post to the current user's feed
ConnectApi.ChatterFeeds.postFeedItem(null, 
ConnectApi.FeedType.News, 'me', input, null);

I then created a simple trigger to notify the user whose name begins with ‘keir.chatter’ when a new user is added to the system - note that this is a chatter free user - the user doesn’t need a full Salesforce license as the post isn’t associated with a Salesforce record:

trigger user_ai on User (after insert)
{
  User notifyUser=[select id from User where
                    username like 'keir.chatter%'];
  MentionUtils.NotifyUser(notifyUser.Id,
            ' a new user has been created - ' +
            trigger.new[0].username);
}

Note that the trigger is set up to handle a single record at a time, purely for the purposes of this post.  This does show up one weakness of this technique though, as there is no way to bulk post a number of messages at the time of writing (September 2014).  If I needed to handle multiple records in this case I’d just post a large message containing information about all of the users that had been added.  If I needed to notify a different user per record, I’d have to use some asynchronous processing (either @future or batch Apex) to avoid breaching governor limits.

Adding a new user to the system:
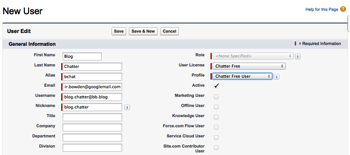
 

Screen Shot 2014 09 07 at 16 04 51


sends a notification to my chatter user:
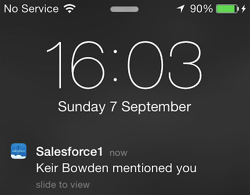
 

Screen Shot 2014 09 07 at 16 54 16


accessing Salesforce1 shows the red bell indicating I’ve received a notification:


Screen Shot 2014 09 07 at 16 55 37


tapping the bell shows a summary of the post:
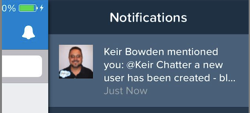
 

Screen Shot 2014 09 07 at 16 55 53


and finally, click on the notification takes me to the full post:
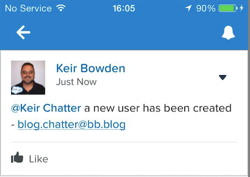
 

Screen Shot 2014 09 07 at 16 56 08


I’ve added this utility class and unit test to my SF1Utils github repository and unmanaged package that I created for an earlier post

Friday 5 September 2014

Check File Size on Upload in Visualforce

When uploading a file via the Visualforce apex:inputFile standard component, if the file size exceeds the particular Salesforce limit (e.g. uploading an attachment greater than 25Mb in size), the first the user knows about this is after the file has been uploaded to the server and an attempt is made to insert it into the database.  In the event of a large file over a slow connection (exactly the type of connection I am using to write this post from the North Norfolk coast), this isn’t the greatest user experience.

A better way would be to check the size of the file can be handled on the server prior to starting the upload.  Up until a few years ago, this wasn’t possible using regular HTML and JavaScript, instead something like a flash plugin was required. The advent of HTML5 introduced the File API, which provides access to the file and its metadata directly in the browser.

To demonstrate this I have a simple page that uses the account standard controller, with an extension controller to insert the attachment.  The page displays the current set of attachments associated with the record and a button to allow a new attachment to be uploaded:

Screen Shot 2014 09 05 at 17 21 19

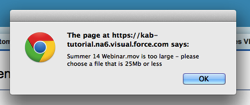
Clicking the upload button and selecting a file larger than 25Mb (a 120Mb+ movie in this case), cancels the form submission and pops up an alert explaining the problem to the user:

Screen Shot 2014 09 05 at 17 25 33

As I’m on a slow connection, I’ve also added a warning when the user chooses a file that is over 2Mb in size - in this case they have the option to continue, on the understanding it may take a while:

Screen Shot 2014 09 05 at 17 25 52

The file checking is carried out in JavaScript, from an onclick handler on the ‘Upload’ button:

function checkFileSize()
{
    var goodSize = true;
    $('input[type=file]').each(function()
    {
        if(typeof this.files[0] !== 'undefined')
        {
            var file = this.files[0],
                size = typeof ActiveXObject !== 'undefined' ?
                    getIEFileSize(file)
                    :
                    file.fileSize || file.size;

            goodSize = 25000000 > size;
            if(!goodSize)
            {
                alert(this.files[0].name +' is too large - please choose a file that is 25Mb or less');
            }
            else
            {
            	if (2000000 < size)
            	{
                    goodSize=confirm('The file size is ' + size +
                    	' bytes - this may take some time. Are you sure you wish to continue');
                }
            }

            return goodSize;
        }
    });
    return goodSize;
}

This function uses JQuery to iterate the file elements on the page (one in this case), and for each input, gets the first (and only) file chosen.  the call to getIEFileSize allows this page to work with Internet Explorer prior to version 10, although I haven’t tested this recently, as I only use Macs these days. For non-IE browsers, the size is determined by the filesize or size properties (filesize is deprecated now, but its always a good idea to allow for older browsers!).  

The rest of the function simply checks the size of the file and generates an alert or confirmation dialog box as required.  Finally, a true/false result is returned to the onclick handler - if false, the form submission will be cancelled.

You can access the full page here, and for the sake of completeness, the full controller here.