Saturday 25 April 2015

Lightning Components and JavaScript Libraries

Lightning Components and JavaScript Libraries

The Problem

Anyone who has been following the Salesforce developer community’s work with Lightning Components closely will no doubt have read a few posts around including JavaScript libraries into components. This has more stringent security requirements, in that you have to load the JavaScript via a static resource rather than an external CDN from the likes of Google or Microsoft, but that’s not really anything to worry about, as it only adds a few minutes to development. What has been an issue is the order of library loading, and the fact that the libraries aren’t always initialised as they should be in an afterRender handler.  

Workarounds

Enrico Murro did a great job of writing this up on his blog, and produced a sample solution based on Require.js. Another solution was provided by Skip Sauls, as detailed on this Stack Exchange thread.

I wasn’t particularly keen on adding additional libraries and/or unmanaged packages, so my approach was to move the JavaScript that relied on included libraries out of initialisation functions and behind buttons that users clicked. I wasn’t particularly keen on my own solution either, but it looking for better workarounds seemed likely to be a not great use of my time, as I was convinced that there would be a native solution before long.

The Solution

And here is the native solution as of the Spring 15 release - the <ltng:require /> component. This allows you to specify the JavaScript and CSS files that your component relies on, and these will be loaded in the order that you list them.  It also provides an afterScriptsLoaded attribute that allows you to define a client-side controller to execute once everything is loaded, to carry out your initialisation processing. 

Here’s an example of where I’ve used this to load the QUnit JavaScript testing framework and the SinonJS stub/mock framework and then execute a test from the controller. First the markup that lists the required artifacts:

<ltng:require scripts="/resource/qUnitJS_1_18_0,/resource/Sinon_1_14_1"
    styles="/resource/qUnitCSS_1_18_0" afterScriptsLoaded="{!c.doInit}"/>

the controller method:

doInit : function(component, event, helper) {
	helper.runTests();
}

which is a lot less effort and/or a better user experience than the workarounds. Once again, masterful inactivity pays off!

Related

Saturday 18 April 2015

Lightning, Visualforce and the DOM

Lightning, Visualforce and the DOM

Introduction

Lightning Components entered beta in the Spring 15 release, were the subject of a Salesforce Developer Week and have been generating a huge amount of interest ever since. Developers now face a choice when building a custom Salesforce UI of whether to use Visualforce or Lightning. To my mind they each bring their own pros and cons, but one scenario where Lighting is an obvious choice (with a few caveats) an application where the business logic will reside on the client in JavaScript.

Demo Page

To demonstrate this, I’m building two versions of a simple page to output basic account details in Bootstrap panels:

Screen Shot 2015 04 18 at 15 31 40

Lightning Implementation

One distinguishing feature of the lightning implementation is the number of artefacts :

  • Apex Controller to provide access to data
  • Lightning Component Bundle to output the account panels, consisting of:
    • Lightning Component
    • JavaScript controller
    • JavaScript helper
  • Lightning Application to provide an URL-addressable "page" to view the component

The Apex controller has a single method to retrieve the accounts - note how I can re-use the same method across Lightning and Visualforce by applying more than one annotation:

public class AccountsListController
{
    @AuraEnabled
    @RemoteAction
    public static List<Account> GetAccounts()
    {
        return [SELECT id, Name, Industry, CreatedDate
                FROM Account
                ORDER BY createdDate DESC];
    }
 }

The lightning component is a little lengthy, due to the HTML markup to generate the Bootstrap panels, so I’ve made it available at this gist. The interesting aspects are:

<aura:attribute name="accounts" type="Account[]" />
<aura:handler name="init" value="{!this}" action="{!c.doInit}" />

the first line defines the list of accounts that the component will operate on, while the second defines the JavaScript controller action that will be executed when the component is initialised, which will populate the accounts from the database into the attribute.

The markup to output the panels for the accounts utilises an aura:iteration component,which wraps the bootstrap panel HTML and allows merge fields to be used to access account fields:

<aura:iteration items="{!v.accounts}" var="acc">
  <div class="row-fluid">
    <div class="col-xs-12 fullwidth">
      <div class="panel panel-primary">
        <div class="panel-heading">
	  <h3 class="panel-title">{!acc.Name}</h3>
        </div>
      ....
</aura:iteration>

for those from a Visualforce background this is a familiar paradigm - a custom tag that binds to the collection, followed by HTML and merge fields to format the collection elements.

The JavaScript controller is very simple, most of the work is done in the helper, in order to allow reuse elsewhere in the bundle in the future: 

({
    doInit: function(component, event, helper) {
	// Display accounts
	helper.getAccounts(component);
    }
})

The JavaScript helper doesn’t have a huge amount of code in it either - it creates an action tied to a server side method, defines the callback to be executed when the action completes and queues the action:

({
  getAccounts: function(component) {
	var action = component.get("c.GetAccounts");
	var self = this;
	action.setCallback(this, function(a) {
		component.set("v.accounts", a.getReturnValue());
	});
	$A.enqueueAction(action);
  }
})

the most interesting aspect of this code is the line that sets component’s accounts attribute to the result of the action:

component.set("v.accounts", a.getReturnValue());

that’s all I need to do to update the contents of the page - due to the data binding of the aura:iterator, updating the attribute rewrites the DOM with the new markup to display the accounts. 

For the sake of completeness, here’s the markup for the Lightning application, which provides a way for the component to be accessed via a URL:

<aura:application >
    <c:AccountsList />
</aura:application>

Visualforce Implementation

To implement the page in Visualforce, I have the following artefacts:

  • Apex Controller (the same one as in the Lightning section, above)
  • Visualforce Page
  • Visualforce Component containing the JavaScript business logic. This could reside in the page, but I find it easier to write JavaScript in a component without the potential distraction or confusion of the HTML markup. 

The Visualforce page has a small amount of markup to pull in the bootstrap resources and provide the containing responsive grid:

<apex:page controller="AccountsListController" applyHtmlTag="false" sidebar="false"
           showHeader="false" standardStyleSheets="false">
  <html>
    <head>
      <apex:stylesheet value="{!URLFOR($Resource.Bootstrap_3_3_2, 'bootstrap-3.3.2-dist/css/bootstrap.min.css')}"/>
      <apex:stylesheet value="{!URLFOR($Resource.Bootstrap_3_3_2, 'bootstrap-3.3.2-dist/css/bootstrap-theme.min.css')}"/>
      <apex:includescript value="{!$Resource.JQuery_2_1_3}" />
      <apex:includeScript value="{!URLFOR($Resource.Bootstrap_3_3_2, 'bootstrap-3.3.2-dist/js/bootstrap.min.js')}"/>
      <c:AccountsListJS />
    </head>
    <body>
      <div class="container-fluid">
        <div class="row-fluid">
            <div class="col-xs-12 col-md-9">
                <div id="accountsPanel">
                </div>
            </div>
        </div>
      </div>
    </body>
  </html>
</apex:page>

while the heavy lifting is done by the JavaScript in the AccountsListJS component. Again this is somewhat lengthy so I’ve made it available as a gist. One aspect that stands out is the JavaScript to process the accounts received from the server and display the bootstrap panels:

renderAccs : function(accounts) {
            var markup='';
            $.each(accounts, function(idx, acc) {
                            markup+= '  <div class="row-fluid"> \n' +
                                    '    <div class="col-xs-12 fullwidth"> \n' +
                                    '      <div class="panel panel-primary"> \n' +
                                    '        <div class="panel-heading"> \n' +
                                    '          <h3 class="panel-title">' + acc.Name + '</h3> \n' +
                                    '        </div> \n' +
                                    '        <div class="panel-body"> \n' +
                                    '          <div class="top-buffer table-responsive"> ' +
                                    '            <label>Industry: </label>' + acc.Industry +
                                    '          </div> \n' +
                                    '        </div> \n' +
                                    '        <div class="panel-footer"> \n' +
                                    '       </div> \n' +
                                    '      </div> \n' +
                                    '    </div> \n' +
                                    '  </div> \n' +
                                    '  <div class="fluid-row"> \n' +
                                    '    <div class="col-xs-12 top-buffer"> \n ' +
                                    '    </div> \n' +
                                    '  </div> \n';
                        });
    $('#accountsPanel').html(markup);
}

 in the Visualforce case, the DOM manipulation to render the Bootstrap panels is entirely down to me - I have to iterate the returned list of accounts, programmatically generate all of the HTML and then set this into the HTML element with the id of “accountsPanel”. This hardly satisfies the separation of concerns design principle, as it tightly couples the business logic with the presentation. If I decide to move to another presentation framework, I have to change the HTML markup and the JavaScript. Its also much more error prone - Douglas Crockford described the browser as a hostile environment to program in for good reason. I could alleviate this by introducing a framework such as Knockout, but that comes with its own learning curve.

Conclusion

So does this mean that we can forget about Visualforce when building apps that primarily execute client-side? Not entirely at present, at least in in my opinion.  Bootstrap lends itself well to Lightning, as its only really concerned with the display of data - it doesn’t try to handle requests and routing, and doesn’t make much use of JavaScript to style elements.  Integration with a framework that carries out progressive enhancement, such as jQuery Mobile, would require a fair bit of custom JavaScript to re-apply the progressive enhancement to the updated DOM elements. 

Saturday 4 April 2015

Loading Salesforce Data into Analytics Cloud

Loading Salesforce Data into Analytics Cloud

Introduction

In my earlier post on Analytics Cloud (aka Salesforce Wave) I showed how to load data from a CSV file. Another common use case is to load Salesforce data, such as Cases and Opportunities, for example to see how performance has improved (or otherwise!) over time.

Setting Up

To get started, access the Data Monitor page by clicking the gear icon:

Screen Shot 2015 04 04 at 16 44 04

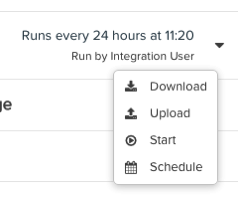
this takes you to the Dataflow View. The Analytics Cloud provides a Default Salesforce Dataflow that you can download from the drop down on the right hand side of the page:

Screen Shot 2015 04 04 at 16 47 23

This will download a Dataflow Definition file in JSON format. The default data flow is documented in the Analytics Cloud Implementation Guide, so I won’t go into further detail on that here. Instead I’ll walk through a Dataflow Definition that I use to bring the case data from my Salesforce instance. The full JSON file can be downloaded from the Related section below.

Loading Case Data

The following JSON stanza pulls the Case records and creates an interim dataset called “Extract_Cases” - the dataset name is important as will be explained later:

    "Extract_Cases":{
        "action":"sfdcDigest",
        "parameters":{
            "object":"Case",
            "fields":[
                {
                    "name":"CaseNumber"
                },
                {
                    "name":"ContactId"
                },
                {
                    "name":"AccountId"
                },
                {
                    "name":"Type"
                },
                {
                    "name":"Hours_Worked__c"
                },
                {
                    "name":"Subject"
                },
                {
                    "name":"Status"
                },
                {
                    "name":"Description"
                },
                {
                    "name":"CreatedDate"
                },
                {
                    "name":"ClosedDate"
                }
            ]
        }
    }

this pulls all of the case data, but the account and contact information is only available as Salesforce IDs, which isn’t particularly helpful if I want to investigate performance for specific customers, so I need to augment the dataset with the Account and Contact details. The first thing I need to do is extract the Account and Contact data to interim datasets:

    "Extract_Contacts":{
        "action":"sfdcDigest",
        "parameters":{
            "object":"Contact",
            "fields":[
                {
                    "name":"Id"
                },
                {
                    "name":"Name"
                }
            ]
        }
    },
    "Extract_Accounts":{
        "action":"sfdcDigest",
        "parameters":{
            "object":"Account",
            "fields":[
                {
                    "name":"Id"
                },
                {
                    "name":"Name"
                }
            ]
        }
    }

 Once I have the Account/Contact datasets, I can augment the interim Case dataset, first with the contact name. Note that I have to specify the “Extract_Cases” interim cases dataset as the “left” parameter value and the “Extract_Contacts” dataset as the “right”. the left/right_key parameters define the fields from each dataset that tie the contacts to the cases, The results of the transformation are stored in the interim dataset “Transform_Augment_CaseWithContactDetails" :

    "Transform_Augment_CaseWithContactDetails":{
        "action":"augment",
        "parameters":{
            "left":"Extract_Cases",
            "left_key": [ "ContactId" ],
            "relationship": "CaseContact",
            "right":"Extract_Contacts",
            "right_key": [ "Id" ],
            "right_select":[
                "Name"
            ]
        }
    }

Next, I augment the Account name - note that the “left” parameter dataset value is “Transform_Augment_CaseWithContactDetails” - the dataset created after augmenting with the contact name.  If I use the original “Extract_Cases” dataset I discard the contact information I’ve worked so hard to add. This is something I have real trouble remembering for some reason!

    "Transform_Augment_CaseWithAccountDetails":{
        "action":"augment",
        "parameters":{
            "left":"Transform_Augment_CaseWithContactDetails",
            "left_key": [ "AccountId" ],
            "relationship": "CaseAccount",
            "right":"Extract_Accounts",
            "right_key": [ "Id" ],
            "right_select":[
                "Name"
            ]
        }
    }

Now that the Account/Contact information has been added to the Cases, I can register the fully augmented dat set so that it can be used in the Analytics Cloud: 

    "Register_Dataset_ClosedCases":{
        "action":"sfdcRegister",
        "parameters":{
            "alias":"AllCases",
            "name":"AllCases",
            "source":"Transform_Augment_CaseWithAccountDetails"
        }
    }

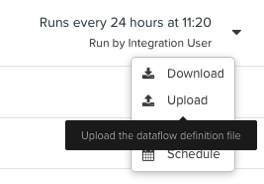
I then upload the Dataflow via the same drop down that I downloaded it from:

Screen Shot 2015 04 04 at 17 20 42

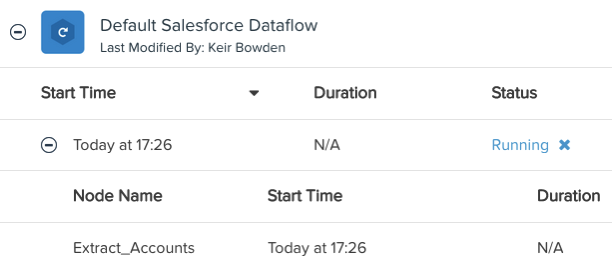
and then choose the Start option from the same menu to execute the load:

Screen Shot 2015 04 04 at 17 27 10

Once the dataset is loaded, I receive an email notification and I can then start exploring it, for example to see the average days worked for cases grouped by customer:

Screen Shot 2015 04 04 at 17 23 43

(I can only show the BrightGen figure as this dataset contains real customer data!)

Related